Saturday, December 20, 2014

If you expect a firewall to behave like a router...

... you are gonna have a bad day.

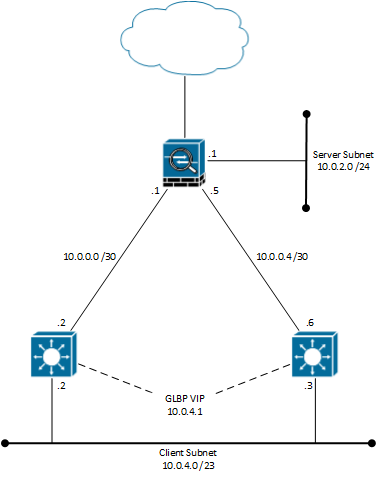
I just had a task, where a network needed to be changed from a layer 2 configuration and into a layer 3 configuration. The network design below is a somewhat simplified replication, that will illustrate the issue with doing dynamic routing on a Cisco ASA firewall.
So, a design using two multi-layer switches configured with GLBP for the client subnet, which are connected to a separate interface of the ASA firewall. OSPF was configured between the ASA and the two MLS routers. The expectation here was that the clients would be load balanced to use each of the MLS routers using GLBP and the MLS routers would then send traffic over their links to the firewall facilitating access from the client network to either the Internet or the server subnet.

However, the mistake I made, when making a up the proof of concept (for the routing part of this setup), was that I replaced the ASA firewall with another router expecting them to handle routing somewhat similarly. When the time came to configure the network I discovered that the ASA did not load balance the trafik over the two links - instead it installed the route to 10.0.4.0 /23 only over one of the two links even though the OSPF database showed that both the MLS routers sent the subnet in their LSAs. The ASA would failover to the other link in case of a link failure, but it only installed the path through one of the two MLS routers into the routing table.

Below is the output of a show route on the ASA (after I borrowed one to lab this up).
ASA# show route
<output omitted>
C    10.0.0.0 255.255.255.252 is directly connected, LINK1
C    10.0.0.4 255.255.255.252 is directly connected, LINK2
O    10.0.4.0 255.255.254.0 [110/11] via 10.0.0.2, 1:10:36, LINK1
C    10.0.4.0 255.255.255.0 is directly connected, SERVERS
And then a show ospf database router command on the same ASA to show the routes from both MLS routers.
ASA# show ospf database router
<output omitted>
LS age: 433
  Options: (No TOS-capability, DC)
  LS Type: Router Links
  Link State ID: 2.2.2.2
  Advertising Router: 2.2.2.2
  LS Seq Number: 80000008
  Checksum: 0x1a7
  Length: 60
   Number of Links: 3
    <output omitted>
    Link connected to: a Stub Network
     (Link ID) Network/subnet number: 10.0.4.0
     (Link Data) Network Mask: 255.255.254.0
      Number of TOS metrics: 0
       TOS 0 Metrics: 1

  LS age: 414
  Options: (No TOS-capability, DC)
  LS Type: Router Links
  Link State ID: 3.3.3.3
  Advertising Router: 3.3.3.3
  LS Seq Number: 80000007
  Checksum: 0xdccc
  Length: 60
   Number of Links: 3
    <output omitted>
    Link connected to: a Stub Network
     (Link ID) Network/subnet number: 10.0.4.0
     (Link Data) Network Mask: 255.255.254.0
      Number of TOS metrics: 0
       TOS 0 Metrics: 1
The route to 10.0.4.0 /23 is received from both the MLS routers, but the route installed in routing table of the ASA is only the one with the next-hop of 10.0.0.2

I have not found a way to make the ASA behave more like a router in a case like this, but perhaps it was never meant to... The problem here was solved by putting a router in front of the firewall.

I would like to make it clear that I (sadly) do not work much with the Cisco ASA products and this was the first time I actually configured OSPF on an ASA. I made the assumption that it would behave less like a firewall product, when it came to routing, just because it had Cisco stamped on it.

If anyone has any insight to impart regarding dynamic routing configuration on the ASA products please do drop a comment or send me private a message - I would love to have the discussion.
Friday, December 12, 2014

OSPFv2 Packet Types

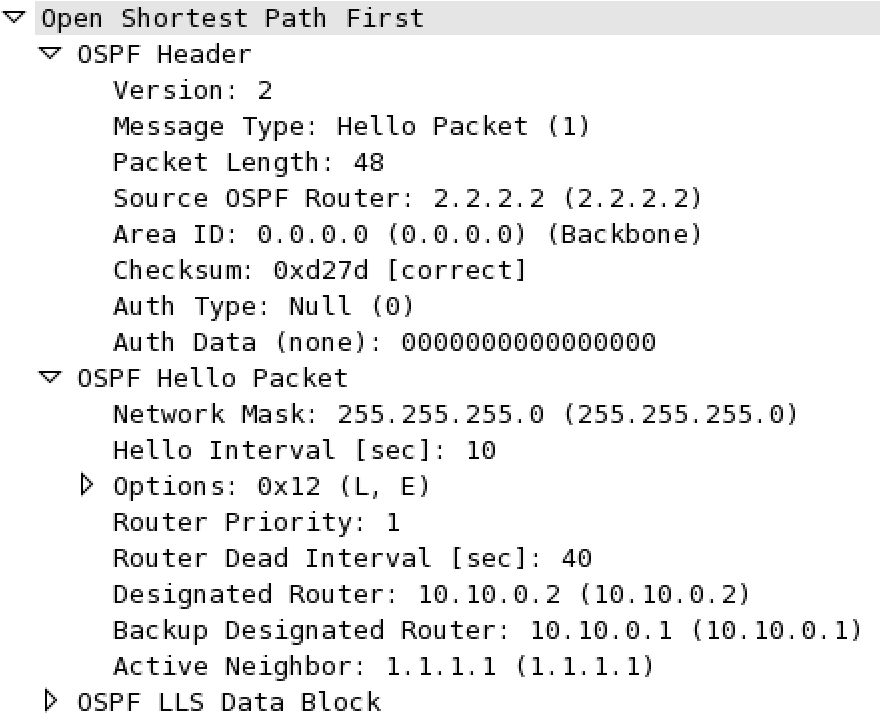
OSPFv2 uses five different types of packets when communicating with neighboring routers and requesting and sending Link-State Advertisements (LSAs). These packets are (briefly) described below and also shown in a packet capture from a lab environment (lab topology is shown in the bottom of the post). This is to explain the function of each packet and to show the packet format (in this case from a Wireshark capture of packets from two routers running IOS 15.4).

Hello (type code 1)
Used to discover neighbors, bring neighbors to a 2-Way state and functions as a keepalive between neighbors.
OSPFv2 Hello Packet
Database Description (type code 2)
Used to exchange LSA headers when initially exchanging the topology, so that neighbors have a list of the routers LSAs. Also known as a DD or DBD packet.
OSPFv2 DBD Packet
Link-State Request (type code 3)
Identifies at least one LSA that the sending router would like full details about. Also known as an LSR packet.
OSPFv2 LSR Packet
Link-State Update (type code 4)
Contains a fully detailed LSA. These are sent either in response to an LSR or in the event of a topology change (like a link failure, for example). Also known as an LSU packet.
OSPFv2 LSU Packet
Link-State Acknowledgment (type code 5)
Sent in acknowledgement of each received LSA. This makes the OSPF communication reliable between neighbors.
OSPFv2 LSAck Packet
The packets were captured on router R1 in the topology shown below. To capture all five different packet types the capture was done at the initial forming of the neighbor adjacency between R1 and R2.
OSPFv2 Topology

Sunday, December 7, 2014

OSPFv2 Designated Router

The Designated Router (DR) is any OSPF router connected to a multiaccess network segment and that has the highest priority or Router-ID at the time of the DR election. The role of the DR is to simplify SPF calculations and relieve the need for all neighbors to be fully adjacent on a shared segment and thereby reducing the flooding of LSAs on shared segment with a large number of neighboring routers.

The DR election process
The OSPF routers will wait for the same amount of time as the Dead timer before electing a DR on the shared segment. This is known as the OSPF Wait Time and allows for a grace period for routers to boot up on the shared segment before electing a Designated Router.

On a shared segment there will be an election of a Designated Router (DR) and a Backup Designated Router (BDR). All other routers on the segment, that are neither DR nor BDR, will be a DROther. 

The specifics of the election process is describe below.
  • Routers on a shared segment will listen to neighbors Hellos and collect the priorities and RIDs during the wait interval (wait interval is equal to the dead timer for the interface)
    • If a Hello packet is received during the wait interval from a neighbor, which states that, that neighbor is in fact a BDR (which would mean that a DR is also present) the wait interval will expire immediately and the router will proceed to the DR/BDR election process.
    • Likewise, if a Hello packet is received during the wait interval from a neighbor, which states it is the DR, but no BDR address is set, the wait interval will expire and the router will proceed to the DR/BDR election process.
  • A router examines the RIDs and priorities collected during the wait interval and chooses the highest priority as the Designated Router and the second-highest priority as Backup Designated Router, though only if roles are not advertised by another RID already. If the priority is tied (it is set to 1 by default) the highest Router ID breaks the tie.
There is no preemption of the DR role in an OSPF network; if a DR is listed in the Hello packet it means that no election will be held - the router will join the network using the DR specified in the received Hello packet. This avoids unstable routers continually prompting a DR election, when they come online on the shared segment.

If for some reason the same segment has two DRs elected, each of the DRs will receive the others Hello packet stating itself as the DR for the segment. This will then prompt a new DR/BDR election on the shared segment to mend the network back into a single segment with only one DR and one BDR as the outcome.

OSPF DR/BDR Example
I will detail the workings of the DR with an example configuration using 5 routers connected over a shared ethernet segment. The topology is depicted below.
OSPFv2 DR/BDR Topology
The router R1 is the DR, which was ensured using the command ip ospf priority 255 under the interface connected to the shared ethernet segment. The router R2 was configured with the command ip ospf priority 254 to ensure it got elected as BDR. The routers R3, R4 and R5 are all DROther and configured with the command ip ospf priority 0 to prevent them from ever take part in the election process. Without the priority command the routers would use the default priority of 1 and the DR/BDR would be elected based on the OSPF RID. In the example here the RID is configured as X.X.X.X where the X represents the router number (R1 = 1.1.1.1, R2 = 2.2.2.2, etc). Assuming the priority was not set at all the router R5 would become the DR and the router R4 would become the BDR.

Below is the same topology shown, but this time with arrows indicating the neighbor adjacency states between the routers.
OSPFv2 DR/BDR/DROther Adj. States
The DR and BDR both establish a full neighbor adjacency between each other as well as with all the DROther routers. The DROther routers establish full adjacencies with the DR and BDR only. Between the DROthers they will be stuck in the 2-way state - meaning they receive each others Hello packets, but they do not exchange Database Description Packets with each other.

The process of flooding LSAs is shown and described below. In this case the flooding occurs in response to a simulated link failure on R3 (by shutting down the interfce). When the link goes down, router R3 sends an update to the multicast address 224.0.0.6, which only the DR and BDR listens to.
OSPFv2 Update Step 1
The DR receives the update and proceeds to flood it out its ethernet interface to the multicast address 224.0.0.5, which all OSPF routers listen to.
OSPFv2 Update Step 2
The routers receiving the update will then send an acknowledge to the DR and update their routing information according to the new information - in this case they will remove the network 140.100.3.0/24 from the RIB.

The DR is also the only router allowed to originate a type 2 LSA. The type 2 LSA describes the shared network segment as well as all the attached routers (meaning the routers that have established a full adjacency with the DR on the segment). The LSA type 2 for the example network is shown in the output below.
R1#show ip ospf database network
            OSPF Router with ID (1.1.1.1) (Process ID 1)
                Net Link States (Area 0)
  LS age: 1098
  Options: (No TOS-capability, DC)
  LS Type: Network Links
  Link State ID: 130.1.255.1 (address of Designated Router)
  Advertising Router: 1.1.1.1
  LS Seq Number: 80000007
  Checksum: 0x590A
  Length: 44
  Network Mask: /24
        Attached Router: 1.1.1.1
        Attached Router: 2.2.2.2
        Attached Router: 3.3.3.3
        Attached Router: 4.4.4.4
        Attached Router: 5.5.5.5
The type 2 LSA turns the shared segment into a star topology with the DR in the middle, connected to all routers (including the router that is the DR) on the shared segment.

So, the DR will prevent OSPF routers from excessively flooding the network with control packets and it simplifies the SPF algorithm by providing a single point from which to base calculations - the DR sees all and knows all for the shared segment.

Friday, December 5, 2014

OSPFv2 LSA Types

Part of what makes OSPF hard to understand and troubleshoot is all the different types of Link-State Advertisements (LSAs). Some areas have different LSA types allowed and some can only be originated by specific routers and so on - it's a mess! Take into account the fact that the LSAs are referred to by numbers and in the Cisco CLI they are referred to by names, which is then just another thing you will have to get familiar with when working with OSPF.

Below is a list of OSPF LSA types along with a description of their function in the OSPF domain and the command to show them in the Link-State Database (LSDB) of a Cisco router.

LSA Type 1 - Router LSA
Each router in an area will generate a type 1 LSA - one for each area it is connected to. It contains the routers RID and all the routers IP addresses for interfaces attached to the specific area. It is not flooded beyond the area in which it was originated.
The show ip ospf database router command will show the type 1 LSAs in a routers LSDB.

LSA Type 2 - Network LSA
The Designated Router (DR), on shared segment, originates type 2 LSAs containing the interface IP address of the DR and a list of the DRs connected neighbors in the area. The type 2 LSA is only propagated in the area it is originated in and only by the DR.
The show ip ospf database network command will show the type 2 LSAs in the routers LSDB.

LSA Type 3 - Summary LSA
The summary LSA is originate by an Area Border Router (ABR) and advertises a prefix from one area into another. It will advertise the destination prefixes from a non-backbone area into the backbone including the metric from the ABR to the destination. It will do this for each prefix known, but it can instructed to replace the individual prefixes with a less-specific summary address and thus the ABR is one of the few places, in an OSPF network, that allows for network summarization.
The show ip ospf database summary command will show the type 3 LSAs in the routers LSDB.

LSA Type 4 - ASBR Summary LSA
Originated by an ABR, this type of LSA contains the host address of an Autonomous System Border Router (ASBR) in an area and the cost to reach it from the ABR. This is sent along with the LSA type 5 to allow routers outside the area, of the ASBR, to find a path to the ASBR, redistributing an external route into OSPF. This is not needed for routers in the same area as the ASBR due to the presence of the type 1 and 2 LSAs.
The show ip ospf database asbr-summary command will show the type 4 LSAs in the routers LSDB.

LSA Type 5 - AS-External LSA
The type 5 LSA is originated by an ASBR and contains the E1 or E2 external route information for a prefix redistributed into the OSPF process from another AS (for example BGP, EIGRP or maybe just a connected interface, to name but a few options). Routers not residing in the same area as the ASBR will need an ABR to originate a type 4 LSA containing the information needed to compute the SPF tree to the ASBR.
The show ip ospf database external command will show the type 5 LSAs in the routers LSDB.

LSA Type 6 - Group Membership
Used in Multicast OSPF. The feature is unsupported in Cisco IOS (as far as I know).

LSA Type 7 - NSSA External
The type 7 LSA is flooded in an area by an ASBR in a Not-So-Stubby-Area (NSSA). An ABR will convert the type 7 LSA into a type 5 LSA for other areas. The type 7 LSA allows other routers in the same NSSA area to learn the external routes advertised by the ASBR as one of the features of an NSSA type area is to filter out type 5 LSAs.
The show ip ospf database nssa-external command will show the type 5 LSAs in the routers LSDB.

Those are the most common OSPF LSA types. There are LSA types 8, 9, 10 and 11 as well, but they are bit outside my scope right now. I will probably update this post later on in my studies, when I get to OSPFv3 and MPLS, where I expect I will be working with these types of LSAs in some way.

OSPFv2 Neighbor Adjacency States

OSPF distinguishes between the terms neighbor and adjacency, where neighbor refers to any routers exchanging valid hello packets and adjacency meaning routers that exchange routing information.

So, a router running OSPF may have 3 neighbors in total, but only 2 are adjacent. At the end of this post I will include an example of such a scenario.

So, on to the various eight states an OSPF neighbor relationship can be in. These are the state of the OSPF State Machine a google search for "OSPF State Machine" will yield a great deal of graphical and in-depth explanations - so I will just not try and do that kind of stuff and just list the states with a few clarifying notes on each of them.

Down
The neighbor always starts from the down state and moves to either attempt or init states depending on the OSPF network type. The neighbor will also revert to the down state if the dead interval expires or the neighbor adjacency gets cleared.

Attempt
If the neighbor is manually configured it will enter the attempt state, which indicates that the local router has sent unicast hellos to the configured neighbor, but has not heard any hellos in return. This states is only seen on NBMA network types (like non-broadcast multi-access and point-to-multipoint non-broadcast networks).
This is a transitory state.

Init
The init state indicates that the local router has received a hello packet from a neighbor, but without its own RID contained in the packet. This state occurs on network types that do not enter the attempt state.
This is a transitory state.

2-way
Neighbor is stated as 2-Way when a hello packet is received containing the RID of the local router; this would indicate that the neighbor has received a hello from the local router and thus bidirectional communication is possible.
This state is both a stable and a transitory state depending on the network type. Broadcast networks with will have a DR, a BDR and probably quite a few DROther routers, where the DR and BDR are the only ones to have full adjacencies with all routers - the DROther routers will have full adjacency with the DR/BDR and 2-way state for the rest of the neighbors.

ExStart
If the routers are not meant to be stuck in the 2-way state they will have to negotiate a master/slave relationship and agree on a starting sequence number for subsequent Database Description packets (DBDs). This is basically done by exchanging empty DBDs and comparing the RIDs where the router with the highest RID becomes the master.
(The masters role is to send DBDs first to slave, which in turn allows the slave to reply with a DBD. If the master is done sending DBDs, but the slave is not done yet, the master must keep sending DBDs until the slave indicates it is complete - as the slave is not permitted to send DBDs on its own.)

Exchange
After the master/slave relationship is negotiated the routers will enter the exchange state and start sending DBDs containing their LSAs. The router builds a list of missing LSAs based on the received DBDs.

Loading
After the DBD exchange is over the router will download LSAs from its neighbor based on the list made during the exchange state. This is a transitory state.

Full
When all the LSAs have been downloaded the neighbor adjacency will enter into the full state, which is a steady state for all routers exchanging LSAs - meaning all routers except the DROthers.

Now, on to the OSPF neighbor state example. I will be using the network topology shown in the diagram below and the example will show the outputs from the perspective of the router R3.
OSPFv2 four node broadcast topology
The topology shows 4 routers connected over a shared ethernet segment (130.1.255.0/24). Router R1 is the DR and R2 is the BDR. The rest are DROther.

R3 show ip ospf interface brief
Notice the state of DROTH from the output above and that the Nbrs F/C field shows 2/3 - meaning that 2 routers are adjacent and that there are 3 neighbors in total. A router must be a neighbor to be adjacent, which means that there are 2 out of 3 routers in the full state on this interface.

Below, we see the neighbors of R3 and verify that there are three neighbors in total, where two are in the FULL state and the last is in the 2WAY state.

R3 show ip ospf neighbor

Thursday, December 4, 2014

OSPFv2 Demand Circuit

I recently wrote a post on Paranoid Updates in OSPFv2, which is kind of a "lite" version of the Demand Circuit feature. The topology used in the aforementioned post is reused for this example as well and is pictured below.
OSPFv2 Two Node Topology
The previously mentioned post describes how to reduce LSA reflooding, which will reduce the OSPF control traffic, but not significantly. Reducing the half-hour reflooding of LSAs will not do much on a line with a traffic cap (3G/4G links for example) or maybe a pay-per-use type of line. We may have a 3G uplink for backup purposes and running OSPF over such a link will make it send data constantly with the Hello packets to keep the adjacencies alive. Here is where the demand circuit feature comes into play. The demand circuit is an extension of OSPF and is described in RFC 1793. So, not all devices may support this feature and therefore if only one neighbor supports the feature the benefits will not be seen from configuring it.

This feature, when enabled, will pause all OSPF communication for as long as the network is stable. This includes the paranoid updates as well as Hello packets. The adjacency will form initially and enter a stable state - after which the neighbors stay mute until a change occurs.

This is how to turn it on and verify the configuration.

R1(config)interface gigabitethernet1.255
R1(config-subif)#ip ospf demand-circuit

R1#sh ip ospf int gi1.255
GigabitEthernet1.255 is up, line protocol is up
  Internet Address 130.1.255.1/24, Area 0, Attached via Network Statement
  Process ID 1, Router ID 1.1.1.1, Network Type POINT_TO_POINT, Cost: 1
  Topology-MTID    Cost    Disabled    Shutdown      Topology Name
        0           1         no          no            Base
  Configured as demand circuit
  Run as demand circuit
  DoNotAge LSA allowed
  Transmit Delay is 1 sec, State POINT_TO_POINT
  Timer intervals configured, Hello 10, Dead 40, Wait 40, Retransmit 5
    oob-resync timeout 40
    Hello due in 00:00:02
  Supports Link-local Signaling (LLS)
  Cisco NSF helper support enabled
  IETF NSF helper support enabled
  Can be protected by per-prefix Loop-Free FastReroute
  Can be used for per-prefix Loop-Free FastReroute repair paths
  Index 1/1, flood queue length 0
  Next 0x0(0)/0x0(0)
  Last flood scan length is 1, maximum is 1
  Last flood scan time is 0 msec, maximum is 1 msec
  Neighbor Count is 1, Adjacent neighbor count is 1
    Adjacent with neighbor 2.2.2.2  (Hello suppressed)
  Suppress hello for 1 neighbor(s)

Note that the command is only needed on one end as the feature will be negotiated with the neighboring router (unless negotiation is disabled). So, the output below is from router R2.

R2#sh run int gigabitethernet1.255
Building configuration...

Current configuration : 133 bytes
!
interface GigabitEthernet1.255
 encapsulation dot1Q 255
 ip address 130.1.255.2 255.255.255.0
 ip ospf network point-to-point
end

R2#sh ip ospf interface gigabitethernet1.255
GigabitEthernet1.255 is up, line protocol is up
  Internet Address 130.1.255.2/24, Area 0, Attached via Network Statement
  Process ID 1, Router ID 2.2.2.2, Network Type POINT_TO_POINT, Cost: 1
  Topology-MTID    Cost    Disabled    Shutdown      Topology Name
        0           1         no          no            Base
  Run as demand circuit
  DoNotAge LSA allowed
  Transmit Delay is 1 sec, State POINT_TO_POINT
  Timer intervals configured, Hello 10, Dead 40, Wait 40, Retransmit 5
    oob-resync timeout 40
    Hello due in 00:00:02
  Supports Link-local Signaling (LLS)
  Cisco NSF helper support enabled
  IETF NSF helper support enabled
  Can be protected by per-prefix Loop-Free FastReroute
  Can be used for per-prefix Loop-Free FastReroute repair paths
  Index 1/1, flood queue length 0
  Next 0x0(0)/0x0(0)
  Last flood scan length is 1, maximum is 2
  Last flood scan time is 0 msec, maximum is 0 msec
  Neighbor Count is 1, Adjacent neighbor count is 1
    Adjacent with neighbor 1.1.1.1  (Hello suppressed)
  Suppress hello for 1 neighbor(s)

Notice that the ip ospf demand-circuit command is not entered under router R2's interface, but it is still running as a demand circuit because it is negotiated with router R1.

Wednesday, December 3, 2014

show run all to the rescue

This is gonna be a quick post!

Ever drawn a blank when trying to recall a specific command? You know what you're looking for and it's on the tip of your tongue. Well, I like to use the command show run all to look for the answer. If used right it can quickly find you the default of a command that would otherwise be omitted from regular show run command.

Of course, when looking for something specific, the command show run all won't help much, unless your objective is to wear down the spacebar on the keyboard. To find something specific it will have to be piped to either include some keywords or with the section command to filter out all the insane amounts of default commands.

Below is an example of the command used to show all the configured commands on interface FastEthernet2 on a Cisco 881 router. It lists all the commands configured on the interface that wouldn't be seen under normal circumstances.
AMBO-RT#sh run all | section interface FastEthernet2
interface FastEthernet2
 switchport access vlan 10
 switchport trunk encapsulation dot1q
 switchport trunk native vlan 1
 switchport trunk allowed vlan 1-4094
 switchport mode access
 switchport voice vlan none
 switchport priority extend none
 switchport priority default 0
 mtu 1500
 no ip address
<further output omitted - it goes on for a while>
So, this command could be just the thing needed to jog your memory, when drawing a blank.

Also, if you like to read CLI output, like Joe Pantoliano reads the Matrix, go ahead and do a show run all and take it from the top - you will be amazed how many commands you never knew existed.

OSPFv2 Paranoid Updates

In a stable OSPF domain the routers will periodically sync their Link-State Databases (LSDBs) with each other. This ensures that all routers in an area has the same view of the network by getting a refreshed view of their neighbors LSDBs. This is a feature commonly referred to as Paranoid Update or Paranoid Flooding. Cisco implements OSPFv2 in a way that they reflood LSAs after half the MaxAge time. The MaxAge time defaults to 3600 seconds (60 minutes) and therefore the LSAs will be reflooded after 1800 seconds (30 minutes).

The below diagram shows the network topology used in the following example.
OSPFv2 Two Node Topology
So, the way to turn the periodic LSA flooding off (if for some reason you would want that) is by going under the interface and issuing the command ip ospf flood-reduction. Below is the output of a show ip ospf interface command on router R1, which shows an interface before turning flood-reduction on.
R1#show ip ospf interface
Loopback0 is up, line protocol is up
  Internet Address 140.1.255.1/32, Area 0, Attached via Network Statement
  Process ID 1, Router ID 1.1.1.1, Network Type LOOPBACK, Cost: 1
  Topology-MTID    Cost    Disabled    Shutdown      Topology Name
        0           1         no          no            Base
  Loopback interface is treated as a stub Host
GigabitEthernet1.255 is up, line protocol is up
  Internet Address 130.1.255.1/24, Area 0, Attached via Network Statement
  Process ID 1, Router ID 1.1.1.1, Network Type POINT_TO_POINT, Cost: 1
  Topology-MTID    Cost    Disabled    Shutdown      Topology Name
        0           1         no          no            Base
  Transmit Delay is 1 sec, State POINT_TO_POINT
  Timer intervals configured, Hello 10, Dead 40, Wait 40, Retransmit 5
    oob-resync timeout 40
    Hello due in 00:00:03
  Supports Link-local Signaling (LLS)
  Cisco NSF helper support enabled
  IETF NSF helper support enabled
  Can be protected by per-prefix Loop-Free FastReroute
  Can be used for per-prefix Loop-Free FastReroute repair paths
  Index 1/1, flood queue length 0
  Next 0x0(0)/0x0(0)
  Last flood scan length is 1, maximum is 1
  Last flood scan time is 0 msec, maximum is 1 msec
  Neighbor Count is 1, Adjacent neighbor count is 1
    Adjacent with neighbor 2.2.2.2
  Suppress hello for 0 neighbor(s)
Below is also shown the contents of the LSDB using the show ip ospf database command - the age and sequence number can be compared after the flood-reduction changes have been made to verify the effects of the command.
R1#sh ip ospf database
            OSPF Router with ID (1.1.1.1) (Process ID 1)
                Router Link States (Area 0)
Link ID         ADV Router      Age         Seq#       Checksum Link count
1.1.1.1         1.1.1.1              493         0x80000006 0x002244 3
2.2.2.2         2.2.2.2              482         0x80000005 0x00A9B7 3
The flooding-reduction command is then entered on R1, as shown below, and the neighbor adjacency bounces quickly up and down - note that the interfaces are point-to-point to reduce the contents of the OSPF database for this example. Subsequently the command was entered on R2's interface as well (not shown).
R1(config)#interface gigabitethernet1.255
R1(config-subif)#ip ospf flood-reduction
R1(config-subif)#
*Nov  30 15:53:46.875: %OSPF-5-ADJCHG: Process 1, Nbr 2.2.2.2 on GigabitEthernet1.255 from FULL to DOWN, Neighbor Down: Interface down or detached
*Nov  30 15:53:46.878: %OSPF-5-ADJCHG: Process 1, Nbr 2.2.2.2 on GigabitEthernet1.255 from LOADING to FULL, Loading Done
Then, another output of the show ip ospf interface command to verify the command has taken effect on the interface.
R1#show ip ospf interface gi1.255
GigabitEthernet1.255 is up, line protocol is up
  Internet Address 130.1.255.1/24, Area 0, Attached via Network Statement
  Process ID 1, Router ID 1.1.1.1, Network Type POINT_TO_POINT, Cost: 1
  Topology-MTID    Cost    Disabled    Shutdown      Topology Name
        0           1         no          no            Base
  Reduce LSA flooding.
  Transmit Delay is 1 sec, State POINT_TO_POINT
  Timer intervals configured, Hello 10, Dead 40, Wait 40, Retransmit 5
    oob-resync timeout 40
    Hello due in 00:00:08
  Supports Link-local Signaling (LLS)
  Cisco NSF helper support enabled
  IETF NSF helper support enabled
  Can be protected by per-prefix Loop-Free FastReroute
  Can be used for per-prefix Loop-Free FastReroute repair paths
  Index 1/1, flood queue length 0
  Next 0x0(0)/0x0(0)
  Last flood scan length is 1, maximum is 1
  Last flood scan time is 0 msec, maximum is 1 msec
  Neighbor Count is 1, Adjacent neighbor count is 1
    Adjacent with neighbor 2.2.2.2
  Suppress hello for 0 neighbor(s)
So, it says it is reducing the LSA flooding. Lets check that out in the LSDB on R1.
R1#show ip ospf database
            OSPF Router with ID (1.1.1.1) (Process ID 1)
                Router Link States (Area 0)
Link ID         ADV Router      Age         Seq#       Checksum Link count
1.1.1.1         1.1.1.1         1116        0x80000006 0x002244 3
2.2.2.2         2.2.2.2         1104        0x80000005 0x00A9B7 3
Sequence number have not changed, but the age is higher than before as would be expected.

After waiting some time the LSDBs of R1 and R2 should now show some differences as a result of them no longer sending periodic LSA updates to each other. The results of the outputs are shown below. Notice the incremented sequence numbers of the LSA for router 1.1.1.1 on R1, but the LSA for 2.2.2.2 has not increased its value. To see the change in full effect the output of the LSDB is shown for R2 as well.
R1#show ip ospf database
            OSPF Router with ID (1.1.1.1) (Process ID 1)
                Router Link States (Area 0)
Link ID         ADV Router      Age         Seq#       Checksum Link count
1.1.1.1         1.1.1.1         1034        0x80000007 0x002045 3
2.2.2.2         2.2.2.2         3030        0x80000005 0x00A9B7 3
R2#show ip ospf database
            OSPF Router with ID (2.2.2.2) (Process ID 1)
                Router Link States (Area 0)
Link ID         ADV Router      Age         Seq#       Checksum Link count
1.1.1.1         1.1.1.1         3055        0x80000006 0x002244 3
2.2.2.2         2.2.2.2         1085        0x80000006 0x00A7B8 3
The sequence numbers are now out of sync because the router updates its LSA locally and thus increments the sequence number, but omits to send it to its neighbor unless a change occurs.

Monday, December 1, 2014

EIGRP Named Mode

Introduced in IOS release 15, the new the EIGRP Named Mode, also known as multi-af mode, streamlined the configuration of EIGRP as opposed to the old way of configuring it - the Classic Mode, also known as autonomous mode. It gathers all the configuration of interface parameters and such under the process configuration and introduces some new features.

Currently, the structuring of the commands are the main difference between Classic and Named Mode, but aside from all new features to come only being supported in multi-af mode, there are a few changes already.

Changes in Named Mode compared to Classic Mode includes some of the following:
  • The Wide Metric is enabled causing the metric to be further scaled due to it being too large for what is allowed in the RIB
  • The delay is now measured in picoseconds instead of microseconds
  • Authentication now supports SHA-256 along with the old MD5
    • SHA authentication does not support key chains and therefore do not support key rotation
The new multi-af (named) mode is fully compatible with the classic mode configuration and there is even a single command that will upgrade your configuration from the classic format to the new multi-af format. This is done by entering in the eigrp upgrade-cli <name> under the eigrp router process. Below is a configuration example of EIGRP configuration before and after the upgrade.
R1#show running-config | section router eigrp
router eigrp 100
 metric weights 0 0 0 1 0 0
 network 10.0.0.0 0.0.0.255
 network 192.168.0.1 0.0.0.0
 passive-interface Loopback0
R1#show running-config | section (interface (GigabitEthernet1|Loopback0))
interface Loopback0
 ip address 192.168.0.1 255.255.255.0
interface GigabitEthernet1
 ip address 10.0.0.1 255.255.255.0
 no ip split-horizon eigrp 100
 passive-interface Loopback0
As seen above, EIGRP has been configure with a non-default K-value configuration, two network statements and a passive-interface. Now, below the EIGRP will be upgraded from classic to named mode using the CLI command eigrp upgrade-cli <name> under the router process.
R1(config-router)#eigrp upgrade-cli NAMED_EIGRP
Configuration will be converted from router eigrp 100 to router eigrp NAMED_EIGRP.
Are you sure you want to proceed? ? [yes/no]: yes
R1(config)#
*Dec  1 12:42:23.769: EIGRP: Conversion of router eigrp 100 to router eigrp NAMED_EIGRP - Completed.
And now we verify the commands have been carried over from classic to named.
R1#show running-config | section router eigrp
router eigrp NAMED_EIGRP
 !
 address-family ipv4 unicast autonomous-system 100
  !
  af-interface Loopback0
   passive-interface
  exit-af-interface
  !
  af-interface GigabitEthernet1
   no split-horizon
  exit-af-interface
  !
  topology base
  exit-af-topology
  network 10.0.0.0 0.0.0.255
  network 192.168.0.1 0.0.0.0
  metric weights 0 0 0 1 0 0 0
 exit-address-family
Now, all the commands that were scattered across the enabled interfaces and the router process has been put under the named mode router config. Namely, the passive-interface for loopback0, which was under the router process in classic mode, and the no split-horizon, which was under the gigabitethernet1 interface in classic mode.

There is a little shortcut in Cisco IOS worth mentioning, when working with named mode, that will shorten the command address-family ipv4 unicast autonomous-system 100 into a much more manageable address-family ipv4 as 100 command. This omits the unicast parameter and shortens autonomous-system to as.

The new command structure may seem a bit confusing at first, but when you need to configure, lets say, default authentication on all EIGRP enabled interfaces - or maybe set the Hello and Hold timers - you will love the af-interface default section of the multi-af configuration.


OSPFv2 Overview

This is a quick overview of the OSPF (Open Shortest Path First) routing protocol. The version of OSPF focused on in this post will be the IPv4 OSPFv2 variant. I will do another post on OSPFv3, which is OSPF for IPv6. This post will be somewhat Cisco centric (again, reading up for the CCIE exam) and so some of the points below may not be directly from the RFC, but more in the adaptation of OSPFv2 in Cisco gear.
  • Open standard based on RFC 2328 (2328 is the current OSPFv2 specification, but there are many RFCs that add different functionality to OSPF apart from what is described in 2328)
  • Classless
  • Link-State routing protocol
  • Uses IP protocol 89
  • Sends Hello messages
    • Used to form neighbor relationships
    • Used as a keepalive between neighbors
    • Default Hello interval is 10 seconds
      • Default on NBMA and point-to-multipoint NBMA links is 30 seconds
  • Uses a Dead timer 
    • Default Dead timer is 4 times the Hello timer
  • Sends partial and full updates
    • Updates are triggered
    • Updates will be sent after 30 minutes by default (half the MaxAge timer)
  • Uses multicast address 224.0.0.5 (all OSPF routers) and 224.0.0.6 (all OSPF designated routers) or unicast to communicate with neighbors
  • Default administrative distance is 110
  • Uses bandwidth as metric for best path selection
    • Default reference bandwidth is 100 mpbs
    • Cost is calculated by ref-bw / interface-bw (example: 100mpbs / 10mbps = cost 10)
  • Supports authentication using clear text, MD5 or SHA
  • Supports route summarization only at Area or Autonomous System Boundaries.
  • Supports equal cost load-sharing
  • Does not support split-horizon, but ignores self-originated LSAs - which is kind of the same thing.
  • Uses Shortest Path First (SPF) algorithm to process the contents of the Link-State Database (LSDB)
Things that has to match in Hello packets for OSPF neighbor adjacency relationships to form:
  • Authentication (if used)
  • Hello and Dead timers
  • Network Mask
  • OSPF Area ID
  • OSPF Area Type
  • Link MTU size
  • No duplicate RIDs
OSPF is a link-state routing protocol, which means all routers have the entire network topology database and calculates the best paths to reach destinations using this topology. The benefits of this is that, unlike distance vector protocols, OSPF routers know exactly what the network looks like from the perspective of all its neighbors - the drawback, though, is the resource consumption of having to maintain a full overview of the topology on every single router. So, when it is said that all OSPF routers must know the exact same topology it is not the entire truth - the truth is that ALL routers in the same area must know the exact topology. 
Areas are a way of dividing an OSPF domain into logical groupings of routers. It allows for smaller topology databases and also enables the routers on the area borders to summarize networks advertised between the OSPF areas. These routers are known as Area Border Routers (ABR).
For OSPF to function properly in a multi-area design, all areas must be connected to area 0, which is the backbone area in OSPF. The reason for this is that ABRs only advertise non-backbone area networks into area 0.

Below is a drawing of a network with two different area configuration - the left one is improper area design and will cause routes in area 4 to be missing from on neighbor routers and the one on the right is a way to fix that design flaw by removing area 4 and including the network into area 3 instead, which will allow for all routes to be available throughout the OSPF multi-area domain.
OSPF Area Designs
The use of areas in OSPF also serves to reduce the flooding of Link-State Advertisements (LSAs) between routers. LSAs describes different network properties depending on the type of LSA. OSPF routers flood different types of LSAs based on its role in the network. In a non-backbone area it will be normal to have LSA types 1 and 2 and ABRs will send type 3 LSAs into the backbone area.

OSPF uses different network types for interfaces enabled for OSPF. The reason is to allow OSPF to determine its behaviour in regards to the following:
  • Whether there will be an election of a DR/BDR on that interface
  • Whether to use multicast or unicast to communicate with neighbors
  • Whether two or more routers are allowed on the same subnet
Below is a table listing the different network types and the OSPF behaviour they dictate.
OSPF Network Types
A last note I want to put on OSPF is that it does not calculate based on the best way to reach a prefix - instad it finds the best way to reach the node (router) that advertises the prefix. The end result is pretty much the same, but if you think about it, one router can have many prefixes and so if you calculate based on each prefix you will have to calculate many times - whereas if you calculate the best path to the node you have the answer to ALL the prefixes with a single calculation.

Tuesday, November 18, 2014

EIGRP Hello and Hold Timers

The Hello and Holddown timers can be a bit tricky to understand if you mostly work with, say, OSPF for example. So let's get down to it.

Both timers are defined under an interface. In Classic Mode it is directly under the interface proces, whereas under the Named Mode it will be defined under the af-interface section of the EIGRP process.

The Hello timer defines how often the local router will send out a Hello packet. This information is not advertised to the neighbor and the Hello timer does not need to match between the neighbors for EIGRP to form adjacencies.

The Holddown timer defines how long the neighbor router will wait for a Hello packet from the local router. The way this works is that the Holddown is advertised in the Hello packet, so that the local router can instruct the neighbor how long it should wait for a Hello packet before tearing down the adjacency.
Hold Time advertised in an EIGRP Hello packet
So, because the Hello timer is locally significant only and the Holddown is the timeout for the local routers adjacency on the neighboring router, there is no need for the timers to match between EIGRP neighbors - unlike OSPF where these timers must match.

Note: I do believe the best-practice recommendation would be to have the timers match on the peering devices - but it is a technical possibility to have them configured differently between the adjacent routers.

Friday, November 14, 2014

Maximum Transmission Unit (MTU)

I was asked, this week by a colleague of mine, to explain to him some things regarding a Maximum Transmission Unit (MTU) setting at a customers site, where the customer told him, that he had to set his MTU to 1472 on an endpoint device in order to accommodate for Dot1Q VLAN tagging in his network (which I doubt he actually needed to do, but some times you need to choose your battles, when explaining network stuff to people who are not well-versed in such).

As I was explaining the meaning and workings of MTU size and when you would want to change it versus when not to, I discovered I actually didn't have all the answers he sought after - mainly because I did not have much of the specifics from this particular setup we were discussing, but also because I didn't actually remember all of the header sizes of IP and Ethernet - I knew the theory of it, but it is hard to convey that without specific numbers, which I feel like I shouldn't be struggling with as a CCIE candidate. So, I sat down and looked it all up, threw some pings and other traffic around in the lab and captured some packets - and now I am writing this down so that I may gain an even better grasp of these concepts myself - and also not have to spend time explaining it to someone, when I can just send them a link to this post.

Alright, on with it!

Maximum Transmission Unit, or MTU, defines the maximum size of an Ethernet frame transmitted on the network. In most cases, this would default to 1500 bytes. Testing the MTU is usually done using ICMP ping requests with a packet size set somewhere between 1300 and 1500 (depending on what you want to test) and the DF-bit set. The DF-bit means that the packet should not be fragmented and if it encounters a point on the path from A to B, that requires fragmentation, an ICMP packet will be returned stating that it needed fragmentation, but the DF-bit was set. This reply is generated by the device, which would otherwise have fragmented the packet - had the DF-bit not been set. When testing the MTU size, you should know how the OS handles ICMP sizes.

Let's do a sample with Windows 7 pinging its local gateway, which is set with an IP MTU of 1500 on its interface.
R1#show ip interface GigabitEthernet1
GigabitEthernet1 is up, line protocol is up
  Internet address is 172.16.0.1/24
  <output omitted>
  MTU is 1500 bytes
  <output omitted>
Let's try a ping size of 1500 with the DF-bit set and see what happens.
Win7 ping size 1500 w/ df-bit set

Okay, that didn't work - but why ?! We said 1500 in the length of the packet and that is what is allowed on the router interface. So, why are we needing to fragment the packet? Well, simply put, the packet is too large for the host to send out its interface without fragmenting it. The reason is that Windows 7 takes the -l 1500 command as meaning 1500 bytes of payload - then it adds the various headers (we'll get to the headers in a second). This makes the packet too big to be transmitted without fragmentation.

Now, lets try lowering the length of the packet to 1472 and see if we can get a packet through.
Win7 ping size 1472 w/ df-bit set

So, the packet was sent and a reply was received. Now, why can we only send with 1472, even though the client and the network is configured for 1500 bytes?

If we were to replicate this on a router, pinging another device with the size set to 1500 it would work - as seen in the output below, where router R2 pings R1 on the same layer 2 subnet (172.16.0.0/24).
R2#ping 172.16.0.1 size 1500 df-bit repeat 1
Type escape sequence to abort.
Sending 1, 1500-byte ICMP Echos to 172.16.0.1, timeout is 2 seconds:
Packet sent with the DF bit set
!
Success rate is 100 percent (1/1), round-trip min/avg/max = 4/4/4 ms
The simple explanation here is, that the packet length is interpreted differently between a router and a Windows 7 machine. The router takes the 1500 bytes value as meaning a 1500 byte Ethernet frame (excluding the Ethernet encapsulation itself), whereas the Windows machine means 1500 bytes of payload - then comes the layer 3 encapsulation and subsequently the layer 2 encapsulation.

Let's break down the packet that makes it through on the Windows machine.
Ping towards 172.16.0.1 with the df-bit set and a payload of 1472.
  • Payload: 1472 bytes
  • ICMP encapsulation: 8 bytes (1480 bytes)
  • IP encapsulation: 20 bytes (1500 bytes)
  • Ethernet encapsulation: 18 bytes (1518 bytes)
  • Transmit on wire
So, as seen above, the packet reaches 1500 bytes after it is encapsulated at layer 3 (IP). This is where the IP source and destination addresses are added (among other things). After that it as handed off to layer 2 and encapsulated in an Ethernet frame containing the source and destination MAC addresses. What you will most likely see when capturing packets is a a frame size of 14 bytes, which is not wrong, but as you can see above I wrote 18 bytes - the 4 extra bytes are from the FCS (frame check sequence), which most network cards don't capture in Wireshark.

Below I have a few MTU size examples. First we will look at a TCP example as seen in a Wireshark capture that doesn't include the Ethernet FCS (most network cards don't include this value).
Alright, next up we have the same example as above, but this time we include the FCS and the result is actually how packets today are sent (by default) on an Ethernet network.
The layer 2 MTU size is now 1518 bytes and this is what counts as the packet sent on the wire.

Now, let's take it a little further and add 802.1Q VLAN tags into the mix. The packet, as seen above, is transmitted to a switch, that then transmits it to another switch over a trunk link - adding a VLAN tag to the 1518 byte long frame. This VLAN tag is worth 4 bytes, which now makes the frame a whopping 1522 bytes!
In 1998, the max-packet was changed, in 802.3, from 1518 to 1522 to allow for the 4 bytes VLAN tagging. So, the new standard size in Ethernet networks today is actually considered to be 1522 - sizes above that would be considered jumbo frames.

This would be standard Ethernet network allowing for 1500 byte packets. However, the tale is not done quite yet. The Ethernet frame may be 1522 (when using VLAN tagging), but the bytes transmitted on the wire for a packet includes a little more than just the frame itself - this is unrelated to the MTU, but still a nice little fun-fact to know about.

Before an Ethernet frame is sent, the sender makes sure the coast is clear by sending a preamble and the SFD (start-of-frame-delimiter). This is known as CSMA/CD (Carrier Sense Multiple Access Collision Detection), which is used in 802.3 networks. This takes up 8 bytes on the wire. And finally, at the end of a transmission there is a silence called the Interframe Gap, which adds another 12 bytes. So, a frame of 1522 bytes becomes a total of 1542 bytes transmitted on the wire. Keep in mind that the preamble, SFD and Interframe Gap does not count towards the MTU size - neither does the Ethernet frame encapsulation including the FCS and VLAN tag (if any).

Thursday, November 13, 2014

EIGRP Wide Metrics

Along with the EIGRP multi-af (named) mode also came the Wide Metrics of EIGRP. Let us do a short recap of the classic metrics before tackling the wide metrics.

The classic metrics consisted of K values 1 through 5 with the default settings listed below.
K1 = bandwidth = 1
K2 = load = 0
K3 = delay = 1
K4 = reliability = 0
K5 = MTU = 0
So, the above means that any K value set to 1 i used in the metric calculation - so by default only bandwidth and delay is used. These K values are used in a formula (shown at the bottom of this post) to scale the bandidth, load, delay etc. and finally produce a number that is the actual metric for EIGRP.

In EIGRP Named Mode, the wide metrics was introduced along with a sixth K value. The delay was also changed from being measured in tens of microseconds to being measured in picoseconds. The new wide metrics, delay in picoseconds and K6 are only part of EIGRP multi-af mode - it is not available in classic mode.

The need for wide metrics, in short, is due to the classic metrics being unable to handle interfaces above 1 Gigabit properly. Due to both the bandwidth and delay values not allowing for the granularity needed. So the wide metrics introduce a 64-bit metric calculation as opposed to the classic 32-bit.

The new 64-bit calculations introduced another issue - the metric in the RIB can only accommodate 4 bytes (32 bits) of data. This is solved by scaling the metric for the RIB using the metric rib-scale <1-255> command in the routing process address-family section.

Below is an excerpt of the Cisco documentation regarding the EIGRP metrics calculation formula.
Use this command to alter the default behavior of EIGRP routing and metric computation and to allow the tuning of the EIGRP metric calculation for a particular type of service (ToS). 
If k5 equals 0, the composite EIGRP metric is computed according to the following formula:
metric = [k1 * bandwidth + (k2 * bandwidth)/(256 – load) + k3 * delay + K6 * extended metrics] 
If k5 does not equal zero, an additional operation is performed:
metric = metric * [k5/(reliability + k4)] 
Scaled Bandwidth= 10^7/minimum interface bandwidth (in kilobits per second) * 256 
Delay is in tens of microseconds for classic mode and pico seconds for named mode. In classic mode, a delay of hexadecimal FFFFFFFF (decimal 4294967295) indicates that the network is unreachable. In named mode, a delay of hexadecimal FFFFFFFFFFFF (decimal 281474976710655) indicates that the network is unreachable.  
Reliability is given as a fraction of 255. That is, 255 is 100 percent reliability or a perfectly stable link. 
Load is given as a fraction of 255. A load of 255 indicates a completely saturated link.
A thing to remember is, that if you change the K value weighting on one router, you will have to change it on all routers in the EIGRP network. The K values must match!

Wednesday, November 12, 2014

Configure Replace

If you plan on loading a lot of different topologies into your lab - be it physical or logical - you may want to consider learning the configure replace command to speed things up a bit. What this command can do for you in the lab is to cut down on the time it takes to "reset to zero" by having a base configuration for your router/switch, that you can then use to overwrite any changes done when tampering with different technologies or lab assignments. What I used to do was to make sure not to write anything to the config and then when I needed to reset the lab I would reload the devices and wait the excruciatingly long time it took for them to reload (this was with my hardware lab consisting of a couple of 2600 routers). When I started building a lab setup for my CCIE I knew I had to find a way to change configs faster and I found that this command would help me do just that.

This is how I setup my lab routers  (the routers I use are CSR1000v - Ciscos virtual cloud routers).
You boot up your router and configure the things you want to be configured just about always.
enable
configure terminal
!
hostname R1
!
logging buffered 8192
!
no aaa new-model
!
no ip domain lookup
!
no ip http server
no ip http secure-server
!
line con 0
 exec-timeout 0
 logging synchronous
!
end
When you are done setting up the very basics  - save the running-config to a file on flash.
copy running-config flash:/config/base.conf
Now, whenever you have configured anything on the router - like, say, some DMVPN or EIGRP configuration - and you want to reload it to the base to start another lab, this is what you do.

From the privileged exec mode enter the following command
R1#configure replace flash:/config/base.conf force
Total number of passes: 1
Rollback Done
R1#
*Nov 12 10:30:42.186: Rollback:Acquired Configuration lock.
R1#
This makes the running-config identical that of the base.conf file saved earlier. The "Total number of passes: 1" indicates it took 1 pass of the config to make it identical. The amounts of passes it will take depends on how much the runnin-config and the base.conf file differs.

There is a bit more to the command if you want to use it outside of the lab, but this just about covers what you may want in a lab environment.

Monday, November 10, 2014

EIGRP Packets

EIGRP communicates using IP Protocol 88 and uses the following packet types:
  • Hello/Ack
  • Update
  • Query
  • Reply
  • SIA-query
  • SIA-reply
Hello packet
Opcode = 5
The Hello packet is used to automatically form adjacencies with neighboring routers. This is done by sending a message to the multicast address 224.0.0.10 or FF02::A. Since this packet type is unreliable the sequence number will be set to 0. The Hello packet includes the routers K values and these must match between neighbors for adjacencies to form - this ensures a consistent metric calculation throughout the network. It also includes the Holdtime, which by default is set to 15 seconds - 3 times the default Hello interval. The Hello packet is also used to send Ack messages if the acknowledge is not able to "piggyback" in another Update, Query or Reply packet.

Update packet
Opcode = 1
The Update packet is used to exchange routing information between neighbors. It is sent as unicast to new adjacencies to inform them of the full topology and afterwards as multicast to all adjacent neighbors, when a topology changes occur (such as change of metric). The first Update packet exchange between neighbors will have the Init flag set - this instructs the neighboring router to advertise all routes. The next Update packet exchange will contain the actual routes. Updates are subsequently only sent when triggered by an event and the contents of the update will be that of the changed network - not the full routing information.

Query packet
Opcode = 3
A query packet is sent in response to a route going into the active state and requests an alternate path to the affected network from the adjacent routers. This is done by sending a Query packet containing the affected network(s) with an infinite metric.
Each destination in a Query packet will be processed by DUAL on the receiving end and a reply will be sent only after the entire Query packet has been processed.

Reply packet
Opcode = 4
The Reply packet is a response to a Query packet and is acknowledged immediately, when received, and then processed by DUAL on the receiving end. If the destination network requested in a Query packet is not in the topology table, the Reply packet will state an infinite metric in its response.

SIA-Query
Opcode = 10
The SIA-query packet is sent if a Query packet has gone unanswered for 90 seconds (by default). The SIA-query requests the router to respond with whether it is still working on processing the original Query request or not. It is sent as unicast to the neighbors that have yet to reply to a Query packet. Upon receiving an SIA-query, the router must immediately send an ack, before processing the contents of the SIA-query.

SIA-reply
Opcode = 11
The SIA-reply packet is sent in response to an SIA-query, if the receiving router is still active for the destination network specified in the SIA-query. This is done by responding with the Active flag set in the response.

EIGRP Feasible Successor Routes

EIGRP uses the term successor and feasible successor to denote the best path and backup path for a particular route. The successor is the route with the Computed Distance (CD). The CD is calculated by taking the advertising routers Reported Distance (RD), which is a neighbors CD to reach the particular subnet, and then adding the cost for the local router to reach the advertising router.

There is also a term known as Feasible Distance (FD). The FD is the lowest metric observed for a given route since the last time it went from active to passive. The FD is used when converging the topology to avoid temporary routing loops by comparing the FD with the RD of a given path. If the RD is higher than the FD it means that there is a possibility that the route could point back to the local router and would therefore cause a temporary routing loop to occur if used. Note that it is only a possibility that it would be a loop and EIGRP is designed with this in mind: it will rather black-hole traffic, than cause a temporary routing loop.

So, let's look at an example. Below is a diagram of an EIGRP network with 3 routers R1 through R3.
EIGRP topology with IP address notations
And below here we have the same topology with the EIGRP metric noted for R3 to reach the network 172.16.1.0/24
EIGRP topology with metric notations
Note: the composite metric is calculated by taking the lowest bandwidth (in kilobits) on the path and the cumulative delay (in 10s of microseconds) on the path in a formula that looks like this: 256*(BW+DLY).

From the perspective of router R3, the network 172.16.1.0/24 is reachable via successor route 10.0.0.5 with Computed Distance of 3072 and through the feasible successor route 172.16.2.1 with a Computed Distance of 3328.

Below is the topology output as seen on R3.
R3#show ip eigrp topology all-links
EIGRP-IPv4 Topology Table for AS(1)/ID(172.16.2.2)
<output omitted>
P 172.16.1.0/24, 1 successors, FD is 3072, serno 37
        via 10.0.0.5 (3072/2816), GigabitEthernet1.13
        via 172.16.2.1 (3328/3072), GigabitEthernet1.23
The output states "1 successors" meaning only one route has the lowest metric and will be entered into the routing table. The Computed Distance and the Reported Distance can be seen in the output in the parentheses (CD/RD).

This feasible route will be a backup route for the network 172.16.1.0/24 in case the current best route, directly through R1, should fail - effectively enabling EIGRP to failover to the backup route without having to mark the route as active and sending out queries to its adjacent neighbors.

This feature also allows EIGRP to do unequal cost load distribution. It can do this because it knows of a loop-free path to the destination with a lower cost than the best path. So, by setting the variance under the routing process, you can influence how much the cost of the best path and the lesser path may vary for them to be used in unequal load distribution. Again, I don't think unequal cost load distribution is a desired feature in most networks - otherwise it would have been a feature of some other routing protocol by now.

Forming adjacencies in EIGRP with primary addresses on different subnets

In EIGRP it is best to only use the network statement for primary addresses of an interface, if adjacencies are required to form properly on that link - the primary address, meaning the address configured on an interface without the secondary added to the end of it.

What you can do in EIGRP is, that you can enable it to run using the network command that matches a secondary address of an interface, but that will only make the process run on that interface - the process will use the primary interface to form adjacencies with any peers. Below is a the configuration of two routers, router R1 and R2. They are connected through a switch on interface GigabitEthernet1.

Router R1 configuration
R1(config)#interface GigabitEthernet1
R1(config-if)#ip address 10.0.0.1 255.255.255.0
R1(config-if)#ip address 172.16.0.1 255.255.255.0 secondary
R1(config-if)#no shutdown
R1(config-if)#exit
R1(config)#router eigrp 1
R1(config-router)#no auto-summary
R1(config-router)#network 10.0.0.1 0.0.0.0
Router R2 configuration
R2(config)#interface GigabitEthernet1
R2(config-if)#ip address 172.16.0.2 255.255.255.0
R2(config-if)#ip address 10.0.0.2 255.255.255.0 secondary
R2(config-if)#no shutdown
R2(config-if)#exit
R2(config)#router eigrp 1
R2(config-router)#no auto-summary
R2(config-router)#network 10.0.0.2 0.0.0.0
The output of a show ip eigrp neighbors command will on both routers shows some confusing information.

EIGRP adjacency table on R1

EIGRP adjacency table on R2

R1 shows a neighbor of 172.16.0.2 on interface Gi1 and R2 shows a neighbor of 10.0.0.1 on interface Gi1.

The addresses that form the neighborship are the primary addresses on the interfaces, where EIGRP is enabled. On R1 the primary address is 10.0.0.1 and on R2 the primary address is 172.16.0.2. The primary address is the address that is used for EIGRP messages regardless of which secondary address is used to enable the EIGRP process on an interface.

I want to point out here, that I actually expected some error messages to pop up and adjacencies to fail between the two routers, but it appears that these routers running IOS 15.4 (they're actually CSR1000v routers) are more capable than the routers I ran this type of scenario on back when I was studying for my CCNP ROUTE exam.

Nonetheless, this type of configuration will most likely not work on routers running older versions of IOS and in the case here, where the adjacencies do form, it gives a somewhat confusing output from the show ip eigrp neighbors command and also in the next-hop addresses of the routing tables.

So, in short, be sure to use the same common subnet as primary addresses for EIGRP enabled interfaces - it may work, but at best it gives confusing output when the neighbor that forms is on a subnet that is not defined in a network command under the router process.

EIGRP Overview

Back when I took my CCNA and subsequently my CCNP, I really liked working with EIGRP. I found it easier to configure and understand than OSPF, but still with a lot more stability and features than RIPv2. I haven't ever come across an installation where it was used in the real world, though, so my experience with EIGRP is only from the lab and a short period where I used it for my own routing protocol at home (with a DMVPN connection to a few other routers over the big web).

Cisco opened up the protocol to the public back in 2013 - but I haven't heard of any vendor supporting it yet. It was also not released in full - Cisco keeps all the fancy features locked up tight. I hope the protocol will gain some traction, but I do not think it is going to happen any time soon.

Quick sidenote: EIGRP got a "facelift" in IOS release 15.0(1)M and introduced a new cli structure for configuring EIGRP parameters. This new method was called "Named Mode" and the previous method of configuring EIGRP was retroactively renamed Classic Mode. The new Named Mode collects all the configuration elements of EIGRP under the process configuration - no more EIGRP interface sub-commands and stuff like that. I will have a separate post about the new Named Mode soon.

This is to be a (somewhat) quick overview of Cisco's routing protocol the Enhanced Interior Gateway Routing Protocol (EIGRP).
  • Classless distance vector routing protocol (sometimes referred to as a hybrid routing protocol)
  • Cisco proprietary
  • IETF Draft draft-savage-eigrp-02
  • Uses IP protocol 88
  • Sends Hello messages
    • Used to form neighbor adjacencies
    • Used as a keepalive between neighbors
    • Default Hello interval is 5 seconds
      • Default on slow (1544kbps and slower) NBMA link is 60 seconds
    • Hello messages are sent unreliably
  • Uses a Holddown timer
    • Default Holddown timer is set to 15 seconds
      • Default on slow NBMA link is 180 seconds
  • Sends partial and full updates
    • Updates are triggered
    • Uses reliable transport protocol (RTP)
  • Uses multicast address 224.0.0.10 for IPv4 and FF02::A for IPv6
    • Retransmissions are sent to each neighbor's unicast address
  • Default administrative distance
    • Internal: 90
    • External: 170
  • Uses a composite metric
    • Defaults to using bandwidth and delay to determine the best path
    • The composite metric can be weighted by tuning the K values 1 through 5
    • The K values must match on all routers
  • Supports a maximum hop count of 255 with the default set to 100
    • The hop count is mainly used as a loop-prevention mechanism
  • EIGRP defaults to using a maximum of 50% of the bandwidth on a link for exchanging hello and updates
    • This can be tuned using the interface level sub-command ip bandwidth-percent eigrp <as#> <seconds>
  • Supports authentication using MD5 (SHA is supported when using Named Mode)
  • Supports route tags
  • Supports next-hop advertisement
  • Supports manual route summarization in any arbitrary point in the network
  • Supports IPv4 and IPv6
  • Supports unequal cost load-sharing
  • Supports split-horizon with poison reverse
  • Uses Diffusing Update Algorithm (DUAL) to control diffusing computations of the topology
Things that have to match for adjacencies to form in EIGRP:
  • Authentication (if used)
  • K values
  • Autonomous System (AS) number
  • Primary addresses on interfaces configured in the same common subnet
The last item warrants a little more explanation and I have made a post that goes into more detail regarding this point here

The EIGRP composite metric is calculated using these five K values:
  1. Bandwidth
  2. Load
  3. Delay
  4. Reliability
  5. Maximum Transmission Unit (MTU)
By default, EIGRP uses only K values 1 and 3. This means that bandwidth and delay are the only values used in the composite metric. When manually tweaking EIGRP metrics it is recommended only to use the delay because the bandwidth is also used by other features such as QoS - whereas delay is only used by EIGRP.

EIGRP uses passive to show a route as stable and active to show a route that is in trouble - meaning a route that has been lost and it is now actively trying to find a new path to the network.

When a router loses reachability to a network it will send out queries to its adjacent neighbors to see if they have a path to the lost network. When this happens, the route is marked as active until replies are heard back from all the neighbors queried or the active timer runs out.
If a reply is not heard within 90 seconds, the local router will send an SIA-query (SIA meaning stuck-in-active) in an attempt to ascertain the reason for the missing reply - or more specifically, is the neighbor still working on the query request or did it not receive the initial query at all. Failure to respond to the SIA-query will result in the local router deleting routes through the non-responsive neighbor and resetting the adjacency. If the neighbor responds to the SIA-query, the active timer will be reset and another SIA-query will be sent again at half the active timer (90 seconds). This allows for an extension of the active timer if the reason behind the slowdown is the neighbors waiting for the active process to complete. A maximum of 3 SIA-queries will be sent before the neighbor adjacency will be reset.

EIGRP supports a graceful shutdown function, where the router sends a hello packet to its neighbor with all the K values set to 255. This happens when an interface running EIGRP is shutdown or the EIGRP process itself is shutdown. It enables the router to signal its neighbors to terminate the adjacency and allows the neighbors to initiate the process of finding an alternate route to the networks advertised by the router shutting down immediately instead of having to wait for the holddown timer to expire.

Below are a few nifty show commands for EIGRP.
The command show ip eigrp traffic gives a statistic of packets sent and received for the EIGRP proces.
The command show ip eigrp neighbors gives a view of the EIGRP adjacency table.
The command show ip route eigrp shows the EIGRP routes currently installed into the routing table.
The command show ip eigrp timers gives a view of the current hello and holddown timers for the EIGRP enabled interfaces.
The command show ip eigrp topology will show the EIGRP topology and will also display the EIGRP process router-id. With the keyword all-links it is possible to view the entire topology as advertised by neighbors (including feasible successor links).